
As you will see at the end of the post – it’s a good thing I’m not a perfectionist! If you don’t cook much but need some Halloween treats AND you have a fairly steady hand (mine? Not so much) you can have around 25-30 good sized treats in no time at all! All you need are these:
One 12×17 jelly roll pan like this one.

One box of cookie cutters like these.

One brownie recipe to fill said 12×17 jelly roll pan – also called Brownies for a Crowd. I found one here.
HALLOWEEN BROWNIE TREATS
If you don’t want to click on the link, or it doesn’t work, no worries – Here it is:
8 eggs
2 cups butter that has been melted
4 Cups of Sugar
1 ½ Cups of powdered cocoa
3 Cups of flour
4 teaspoons vanilla
2 teaspoons of salt
1. Beat eggs in mixer.
2. Add sugar, vanilla, salt and beat for one minute.
3. Pour in melted butter and mix.
4. Sift flour and cocoa together and slowly add to wet mixture.

5. Spread into 12×17 jelly roll pan that has been buttered and dusted with flour.
6. Bake at 350 F for 20-25 minutes.
7. Let completely cool before proceeding.

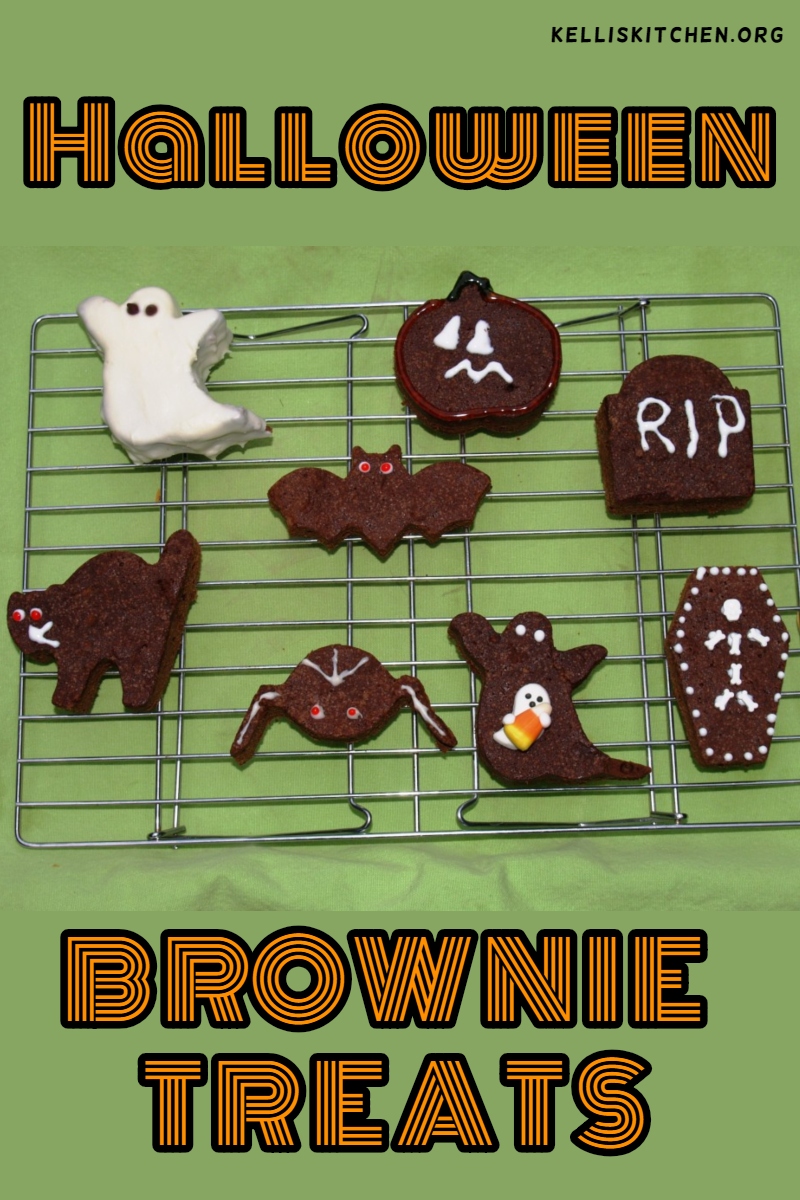
Once the pan is totally cooled, take cookie cutter and begin cutting out shapes like this.

I tried several ways to decorate them and just threw some away! It’s a really good thing I am not a perfectionist because if I was, I would not even bother to post this – but luckily, that trait skipped me so ta-da! Here’s they are.

For those of you who are wondering: The white ghost has almond bark (very hard to spread on flaky brownies) and mini chips for eyes.
The other ghost is the ghost of a Kangaroo – carrying its Joey. Hahahaha!! I thought that was so funny when I did it – Top Girl rolled her eyes………humph! I remember when I was the coolest mom in town!
The coffins look pretty good. I got all the sprinkles at Michael’s. Top Girl particularly liked these treats because – if you don’t count the one with almond bark, there is no icing and she does NOT like icing. Must have something to do with those cans of icing I ate with a spoon when pregnant with her!
I bet you all can come up with lots of much more decorative ways to present these but – these taste really good and my crew was pretty darn proud of my attempt! See ya soon!
These are soooooo cute 😀 😀
Especially partial to the kangaroo ghost 😉
Very creative my friend!
Cheers
Choc Chip Uru
When you make lots of mistakes in the kitchen, you are forced to be creative! 🙂
Glad you like them.
Real Mom Kitchen
I think they’re very cute and I would eat the white ghost with the icing. 🙂
Me too! But then, I love icing!
I’ve never seen any cookie cutters like that over here, I assume that must have them… Reckon I go around with my eyes shut.
Hey! Glad you are back – hope your holiday was good and you are back feeling refreshed. I see a post from you but I’ll have to wait until tonight to read it.
They’re adorable! I love the kangaroo ghost!!
Thanks! I had to be very creative on that one! 🙂
If you take foil and make a bottom on your cookie cutters by squishing the foil up around the cutters. You can save batter and get more brownies. There is only a little bit of trimming to do. You also have to spray the little cookie molds with vegetable spray so they come out easy. Just a tip when you are making just one brownie batch. They look great.
What a great idea! I will do that next time!